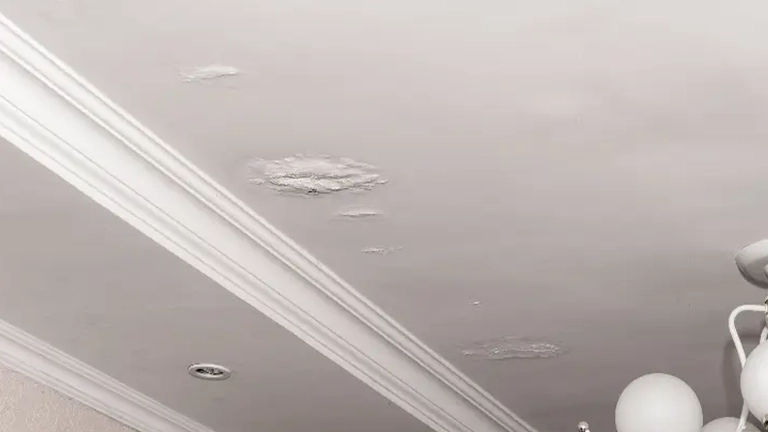
A ceiling water stain tells you a roof is leaking. It almost never tells you where. Water enters the roof at one point, runs along rafters and decking, and drops onto the drywall somewhere else entirely, sometimes fifteen or twenty feet from the actual hole. After 25+ years of tracing leaks on East Valley roofs, I can tell you the finding is the hard part; the fixing is usually the easy part. This guide walks you through how I trace a leak, what you can safely check yourself, and where leaks actually start on Arizona roofs. If water is coming through the ceiling right now, go read what to do if your roof is leaking first, contain the mess, then come back here.
Key takeaways
- The stain on the ceiling is the exit point, not the entry point. Water travels along framing and decking before it drops, so look uphill from the stain.
- The attic is your best diagnostic tool. Water trails, dark stains on the wood, and damp insulation point back toward the source.
- Most leaks start at a short list of usual suspects: flashing, valleys, roof penetrations, cracked or slipped tiles, aged underlayment, and clogged scuppers on flat roofs.
- Check from the ground and from inside the attic. Stay off the roof itself; that part is my job.
Why the water shows up far from the leak
Roofs are built as layered, sloped systems, and every layer gives water somewhere to travel. Rain gets past the tile or shingle, hits the underlayment or the decking, and then follows gravity along whatever path it finds: down a rafter, along the top of a ceiling joist, across the vapor barrier. It keeps moving until it hits something that interrupts the path, usually a nail head, a seam, or a low point, and that's where it drips. The drip point becomes your stain.
This is why patching the roof directly above a ceiling stain so often fixes nothing. The entry point is uphill, sometimes on a different slope, occasionally on the other side of the ridge when wind-driven rain is involved. Water ignores your floor plan. It has its own map, and the whole job of leak detection is reading it backwards.
Step one: gather clues from inside the house
Before you climb anything, note what the leak is telling you:
- When does it show up? Every rain, or only hard monsoon storms? A leak that only appears in heavy, wind-driven rain points at flashing gaps and wind-blown entry points. I wrote a separate guide on why roofs only leak in heavy rain because it's that common here.
- Where exactly is the stain? Measure from two walls and write it down. You'll use those measurements in the attic.
- Is it growing? Trace the stain edge with a pencil and date it. If the ring grows after the next storm, the leak is active. If it never changes, you may be looking at an old, already-repaired leak's scar.
Step two: trace the leak in the attic
The attic is where leaks get found. Go up with a bright flashlight during or shortly after a rain if you can, keep your weight on the joists or truss members, and never step on the drywall between them.
What to look for
- Water trails. Shiny wet lines or dark, dried tracks running down rafters and along decking. Follow any trail uphill. The entry point is at the top of the trail, not the bottom.
- Dark stains on the wood. Decking that has been wet repeatedly turns gray or black. Even when everything is dry, the staining marks the water path.
- Damp or matted insulation. Wet insulation compresses and darkens. Lift a corner and check whether the drywall below it is damp.
- Daylight. Turn the flashlight off and let your eyes adjust. Pinholes of daylight around penetrations or at the ridge are entry candidates.
- Musty smell or mold. Even without visible water, a musty corner of the attic tells you where moisture has been living.
When you find the highest wet point, measure its position from the same reference points you used inside, and if you can, push a piece of wire up through the spot or mark it with chalk. That measurement saves real time when the repair happens, whether I do it or someone else does.
Step three: check the roof from the ground

You do not need to get on the roof to learn a lot. Stand back in the yard or across the street with binoculars and scan slowly, slope by slope, concentrating uphill from where the interior stain sits.
- Tiles that are cracked, slipped out of line, or missing entirely. On a tile roof, anything that breaks the pattern is worth a closer look.
- Shingles that are missing, lifted, curled, or shiny where granules have worn off.
- Flashing that has pulled away from walls, chimneys, or skylights, or sealant that has visibly cracked and split in the sun.
- Valleys holding leaves, dust, and debris. A blocked valley pushes water sideways under the roofing.
- Vents, pipe boots, and satellite mounts. Every hole ever put through a roof is a future leak candidate.
Please stay off the roof itself. Tile breaks under foot traffic, wet surfaces are slick, and every monsoon season sends homeowners to the emergency room over a leak I could have found for free.
Can't find it? That's normal.
Some leaks hide from everybody but the guy who traces them for a living. I'll inspect the roof myself, free, find the actual entry point, and show you photos of what I found. No salespeople, no pressure.
Call or text Andy: 480-363-2898The usual suspects on Arizona roofs
After enough years of leak detection, you learn the same handful of culprits cause most of the trouble. Here's where I look first, by roof type.
Tile roofs
The tiles are not the waterproof layer. They shed most of the water and shade the layer that actually keeps you dry: the underlayment. Cracked and slipped tiles matter because they expose that underlayment to sun and concentrated water flow, and Arizona heat bakes underlayment brittle over the years. When the felt cracks, water goes straight to the decking. If your tile roof is leaking in multiple spots and it's over 15 or 20 years old, the underlayment is the prime suspect, and the honest fix is a re-felt and relay, not a patch on top of failed felt.
Shingle roofs
On shingle roofs I find most leaks at the transitions: flashing where the roof meets a wall or chimney, valley metal where two slopes drain into each other, and pipe boots whose rubber collars split after a few summers of UV. Missing or wind-lifted shingles matter too, especially after a monsoon storm, but the flat middle of a slope is rarely the problem. Water finds the joints.
Flat and foam roofs
Flat roofs drain through scuppers, the openings in the parapet wall that let water off the roof. When dust and debris block a scupper, the roof turns into a very shallow pool, and ponding water finds every crack in the coating and every seam in the surface. I also check parapet walls themselves, cracked elastomeric coating, and any spot where an old patch meets the original roof. If your flat roof leaks, look at the drainage first.
When it isn't the roof at all
A fair number of "roof leaks" I get called for turn out to be something else, and it's worth ruling these out before anyone opens up the roof. AC units and their condensate lines sit in attics and on roofs here, and a clogged condensate drain stains a ceiling exactly like a roof leak, except it shows up in June before the rain does. Water heaters and plumbing runs above ceilings do the same. If your stain appears when it hasn't rained in weeks, think mechanical before you think roof.
What finding and fixing it costs
My inspection costs nothing. I come out, trace the leak myself, and you get photos and a firm bid for exactly what the fix covers. Most East Valley leak repairs land between $500 and $3,500 depending on how far the water got and what has to come apart to fix it; the full breakdown is in my leak repair cost guide, and the repair work itself is covered on the roof repair page. If you're in Chandler, my Chandler roof repair page covers how I handle leaks for local homeowners. The pattern worth knowing: leaks found early sit at the bottom of that range, and leaks that soaked decking for two monsoon seasons sit at the top.
Common questions
Why is the ceiling stain nowhere near the damaged part of the roof?
Because water travels before it drops. It enters the roof at one point, runs along underlayment, decking, rafters, and joists, and falls onto the drywall wherever the path ends. Always search uphill from the stain.
How do I find a leak on a tile roof?
From the ground, look for cracked, slipped, or missing tiles and debris-filled valleys. From the attic, follow the water trail to its highest point. But understand that on tile roofs the real waterproofing is the underlayment beneath the tiles, so the entry point often isn't visible from outside at all. That's when it takes an inspection with the tiles lifted.
Can I use a hose to find a roof leak?
Pros do controlled water testing, working uphill one section at a time with someone watching the attic. It works, but it means someone standing on the roof, so I'd rather you let me do that part. Done wrong, it soaks the attic and tells you nothing.
Is a water stain always an active leak?
No. Some stains are scars from a leak that was already fixed. Mark the edge of the stain, watch it through a storm or two, and if it grows or darkens, it's live.
If you've followed the trail as far as you can and the leak is still hiding, that's what I'm for. Call or text me at 480-363-2898 and I'll come find it myself. The inspection is free, and you'll know exactly what's going on before you spend a dollar.